How to use shadowsocks in PC and chromebook
I am looking for a good vpn in recent two years. Try YunTi and other vpn through the pp2p and l2tp protocol. But it is not very stable in my home and too slow. Shadowsocks is better. Its bandwidth is bigger than 1Mbyte/s in my home. It is enough to watch youtube. But the issue is that I could only use internet brower or the application which support socks5 in my laptop. And I could not use it in my chromebook. In this blog, I use privoxy to forward the socks5 to http port in pc and compile the arm specific shadowsocks software in my chromebook
Note that there are varies method to use shadowsocks. You could of course setup your own vpn. I buy an account from https://shadowsocks.com/(It is not relative to the open source project).
Enable shadowsocks for all the software in my PC
Takes openSUSE Leap 42.1 as example.
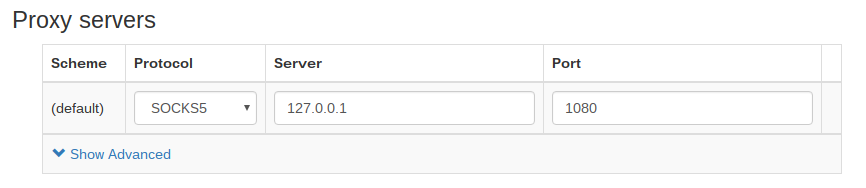
Provixy is a sofware which could forward socks5 for other port to http port. Here, I want to forward socks5 to http 1080.
-
Install privoxy
zypper in privoxy -
Configure privoxy
Edit the config(/etc/privoxy/config):
forward-socks5 / 127.0.0.1:1080 . -
Start privoxy
> sudo systemctl enable privoxy.service
> sudo systemctl status privoxy.service
privoxy.service - Privoxy Web Proxy With Advanced Filtering Capabilities
   Loaded: loaded (/usr/lib/systemd/system/privoxy.service; enabled)
   Active: inactive (dead)

> sudo systemctl start privoxy.service
> sudo systemctl status privoxy.service
privoxy.service - Privoxy Web Proxy With Advanced Filtering Capabilities
   Loaded: loaded (/usr/lib/systemd/system/privoxy.service; enabled)
   Active: active (running) since Mon 2016-02-29 10:50:32 CST; 1s ago
  Process: 9106 ExecStart=/usr/sbin/privoxy --chroot --pidfile /run/privoxy.pid --user privoxy /etc/config (code=exited, status=0/SUCCESS)
  Process: 9103 ExecStartPre=/usr/bin/cp -upf /lib64/libresolv.so.2 /lib64/libnss_dns.so.2 /var/lib/privoxy/lib64/ (code=exited, status=0/SUCCESS)
  Process: 9101 ExecStartPre=/usr/bin/cp -upf /etc/resolv.conf /etc/host.conf /etc/hosts /etc/localtime /var/lib/privoxy/etc/ (code=exited, status=0/SUCCESS)
 Main PID: 9108 (privoxy)
   CGroup: /system.slice/privoxy.service
   └─9108 /usr/sbin/privoxy --chroot --pidfile /run/privoxy.pid --user privoxy /etc/config
Configure shadowsocks for ARM powered chromebook
Shadowsocks-chromeapp is a application of vpn client for chromebook. It is a nodejs application. If there is a nodejs environment(nodejs, npm, cake and so on, it may varies for different nodejs version)in chromebook, we could build and run it. But by default, there is no such environment in chromebook.
There are lots of articles describing how to use shadowsocks in a chromebook. But all of(most of?) these chromebooks are x86 processor inside. For arm based chromebook, one could not use the prebuilt binaries directly(bacause which depends on the binaries do not exists arm based chromebook). And one could not make use of the link of package in these articles too. So, it take me more time to eventually enable shadowsocks in my ASUS chromebook flip(C100PA-BD02).
For x86 chromebook, this one describe the two methods for enable shadowsocks.
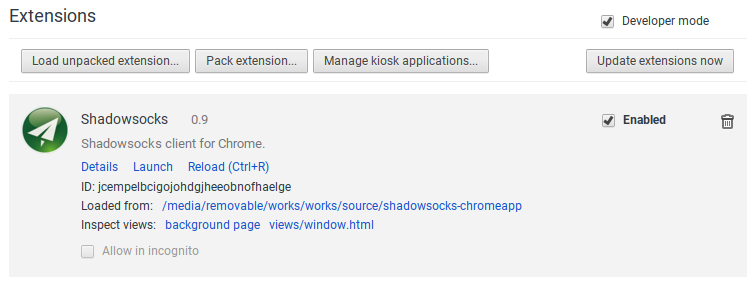
Here is the application after we build successful:
I do not plan to repeat the words above. Here is the specific step for what I am doing in my chromebook. What I need to do is setup the nodejs environment. For any distribution, we could install the nodejs and npm packages through the package manager. But for chromebook, we could not. We have to download and copy the library and binary to specific directory by hand. Luckily, the only dependency of nodejs is glibc.
We need to disable os verification and enable write permission. I paste the log of enable write permission.
-
Check the version of glibc in order to determine which package we should download
There is a soft link point to the real version ld. In my case, it is glibc 2.19.
chronos@localhost / $ ls -l  /lib/ld*.so.*
lrwxrwxrwx 1 root root 10 Jun 10  2015 /lib/ld-linux-armhf.so.3 -> ld-2.19.so
glibc 2.19 is used in opensuse 13.2
-
Download nodejs and its dependency.
We could find out that there is no more dependence except glibc for nodejs:
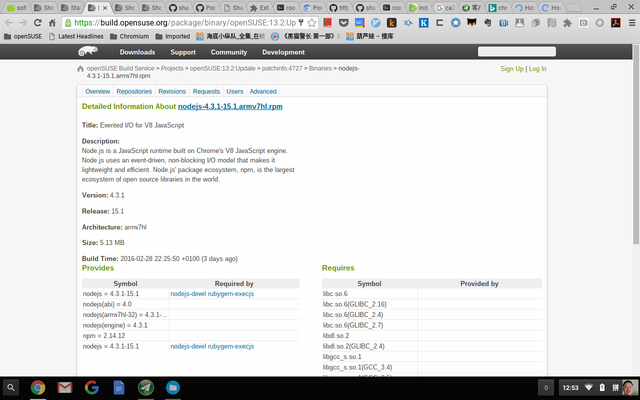
# wget http://download.opensuse.org/ports/update/13.2/armv7hl/nodejs-4.3.1-15.1.armv7hl.rpm [...] nodejs-3.3.1-15.1.armv7hl.rpm 100%[================================================================>] 5.13M 116KB/s in 58s -
Convert from rpm package to cpio image format, and extract it
# rpm2cpio nodejs-4.3.1-15.1.armv7hl.rpm > nodejs-4.3.1-15.1.armv7hl.cpio # mkdir nodejs # cd nodejs/ # cpio -iudm < ../nodejs-4.3.1-15.1.armv7hl.cpio xxx blocks -
Enable write permission for filesystem
Now, we have the nodejs bin and lib, we could copy them to the filesystem and build our application. But we need make fileystem writable before it. Otherwise we will encounter the following error message:
chronos@localhost ~/Downloads/nodejs $ cp -va usr/bin/* /usr/bin/ âusr/bin/nodeâ -> â/usr/bin/nodeâ cp: cannot create regular file â/usr/bin/nodeâ: Read-only file system âusr/bin/npmâ -> â/usr/bin/npmâ cp: cannot create symbolic link â/usr/bin/npmâ: Read-only file system$ sudo /usr/share/vboot/bin/make_dev_ssd.sh --remove_rootfs_verification ERROR: YOU ARE TRYING TO MODIFY THE LIVE SYSTEM IMAGE /dev/mmcblk0. The system may become unusable after that change, especially when you have some auto updates in progress. To make it safer, we suggest you to only change the partition you have booted with. To do that, re-execute this command as: sudo ./make_dev_ssd.sh --remove_rootfs_verification --partitions 2 If you are sure to modify other partition, please invoke the command again and explicitly assign only one target partition for each time (--partitions N ) ERROR: IMAGE /dev/mmcblk0 IS NOT MODIFIED. $ sudo /usr/share/vboot/bin/make_dev_ssd.sh --remove_rootfs_verification --partitions 2 ERROR: YOUR FIRMWARE WILL ONLY BOOT SIGNED IMAGES. Modifying the kernel or root filesystem will result in an unusable system. If you really want to make this change, allow the firmware to boot self-signed images by running: sudo crossystem dev_boot_signed_only=0 before re-executing this command. ERROR: IMAGE /dev/mmcblk0 IS NOT MODIFIED. $ sudo crossystem dev_boot_signed_only=0 $ sudo /usr/share/vboot/bin/make_dev_ssd.sh --remove_rootfs_verification --partitions 2 Kernel A: Disabled rootfs verification. Backup of Kernel A is stored in: /mnt/stateful_partition/backups/kernel_A_20160303_114351.bin Kernel A: Re-signed with developer keys successfully. Successfully re-signed 2 of 1 kernel(s) on device /dev/mmcblk0. $ -
Copy the nodejs files into system
sudo cp -a ./usr/lib/* /usr/lib/ sudo cp -a ./usr/bin/* /usr/bin/ -
Now, we could follow the this arcicle descrbie how to build shadowsocks-chromeapp. Here is the shadowsocks application for chromebook. Node and NPM on Chromebook (Chrome OS).
-
We could use the proxy through SwithyOmega: